Web Applications 101

How do web applications work? What are the key concepts that you should know, and some tools for automating web requests?
We've grown so accustomed to the internet that we usually access it without thinking twice about how it works, and the myriad systems that enable it.
To understand web security, one must first know (at least at a high level) how the web works.
If you're not already familiar with that, here are some recommended readings to get you started:
- https://developer.mozilla.org/en-US/docs/Learn/Getting_started_with_the_web/How_the_Web_works
- https://developer.mozilla.org/en-US/docs/Learn/Common_questions/How_does_the_Internet_work
Key terms
These are some terms that we will be using fairly often in this course while working with web applications. You will likely already be familiar with them. In case they don't seem familiar, I have included a brief (but non-exhaustive!) explanation of each term.
IP address
This is your address on the internet. Every device connected to the internet has one. Here is an example: 162.199.92.181. You can check out your current IP address by Googling it.
IP addresses come in two flavors: IPv4 and IPv6. Most of the IP addresses you encounter will be IPv4 -- they come in the format a.b.c.d where a, b, c and d are integers in the range [0, 255]. This means that there are 256^4 = (2^8)^4 = 2^32 = 4,294,967,296 possible IPv4 addresses. This was once enough, but the world has been running out of IPv4 addresses for a long time.
Hence the move to IPv6, which are much longer and support a vastly expanded space of ((2^4)^4)^8 = 2^128 ~= 3.4 * 10^38 addresses. Here is an example of an IPv6 address: 2001:0db8:85a3:0000:0000:8a2e:0370:7334.
We will most often encounter IPv4 addresses. IPv6 addresses are becoming more common though, and you will find that some phones on certain mobile networks in particular (e.g. AT&T, T-mobile) are assigned primarily IPv6 addresses. Some cloud hosts also provide IPv6 addresses.
Some IP addresses are reserved. For example, 127.0.0.1 represents your local machine, and addresses in the 192.168.x.x and 10.x.x.x space are typically used for internal networks.
ASN
Each IP address is part of a block of IP addresses assigned by the Internet Corporation for Assigned Names and Numbers (ICANN) to a particular organization. Each such block of IP addresses is tagged with a unique number, called an Autonomous System Number (ASN). Check out a list here. There are historically 2^16 = 65,536 ASNs, although that is also changing.
We most frequently refer to ASNs by their organization names. For example, 171.64.x.x belongs to AS32, which is Stanford University.
For a much more detailed (but still fairly succinct) study on IP addresses and networking systems, check out this set of slides by Drew Saunders, a network engineer at Stanford.
URL

This one is pretty straightforward. URL stands for "Uniform Resource Locator", and is a unique address for a particular resource on the internet. In short, it is what you see in your browser address bar.
Note that browsers are increasingly showing only part of the URL. Here is the full version of the sample URL above:

You will see that there is a "https://" prefix to the URL. This is known as the protocol.
Query parameter
Sometimes there are various "query parameters" appended at the end of a URL. In a typical URL, everything after the question mark ? is a parameter. Here is an example:
https://www.youtube.com/watch?v=gN-wjJ07pi8For this Youtube URL, the query parameter is v=gN-wjJ07pi8. This means the web page is able to receive a parameter v with the value of gN-wjJ07pi8.
Multiple query parameters can be strung together with an ampersand &, e.g. ?a=hello&b=world.
HTTP methods: GET and POST
HTTP is a protocol that we use to exchange data over the internet. The current standard protocol is an improved version, HTTPS (or HTTP "Secure"), which makes it difficult for outsiders (say, someone loitering around on your Wifi network) to eavesdrop on your traffic.
There are two common ways to request data over HTTP: GET and POST. GET requests are typically used for fetching web pages -- e.g. when you type in www.google.com in your browser's address bar and hit Enter, your browser is effectively making a GET request to www.google.com.
On the other hand, POST requests are typically used with form data, which would not be convenient (or secure) to transmit using query parameters. For example, when you login to a web app, your browser would most likely make a POST request to some login endpoint, with your credentials as part of the request body. The login endpoint then sends a response to you.
Applied example
Let's say you visit www.corise.com with your browser. In a nutshell, this is what actually happens:
- Your browser goes to whatever DNS server it uses, and asks, "what is the IP address corresponding to www.corise.com?"
- The DNS server replies:
13.33.88.65 - Your browser then makes an HTTP GET request to
13.33.88.65for www.corise.com on a particular port (typically8080or80for web requests). - CoRise's web server on 13.33.88.65 redirects you to https://www.corise.com/ (because CoRise is secure and properly uses HTTPS instead of HTTP!)
- Your browser then makes a request to https://www.corise.com/ on
13.33.88.65, and CoRise's web server returns the HTML code (and other assets, such as CSS stylesheets, images, and so on) needed to render the home page. - Once the webpage has loaded, it might make additional calls to various APIs to fetch additional data (for example, data about you after you perform a successful login).
What happens when you log in?
The Login
Logins are a key part of how we authenticate ourselves on the internet. They are ubiquitous, and usually function the same way.
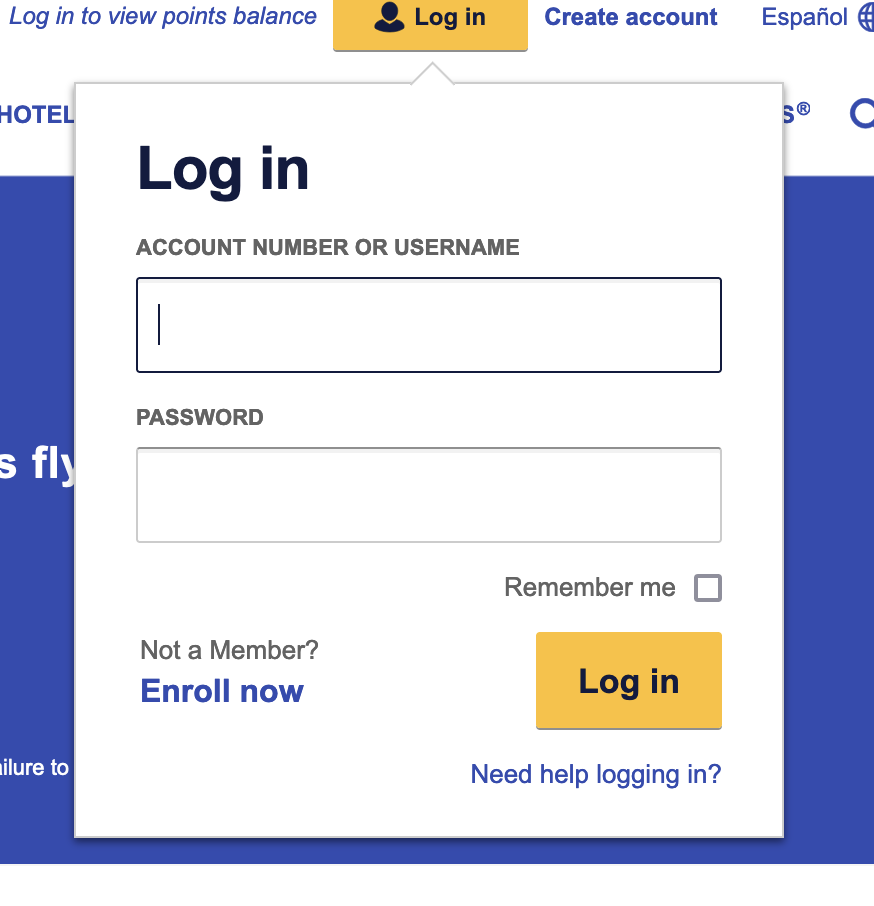
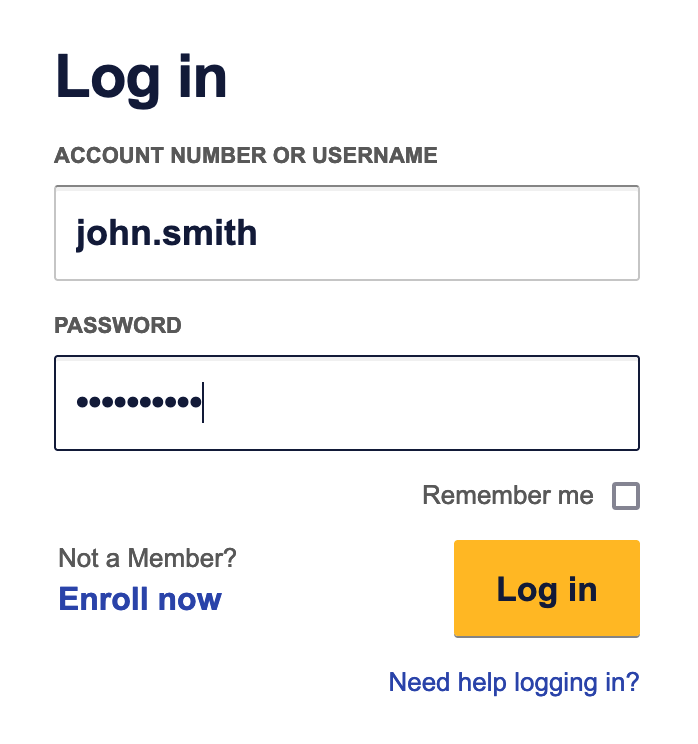
Login forms typically contain:
- Somewhere to type your username
- Somewhere to type your password
- A checkbox for "remember me"
- A link to get help if you can't remember your login credentials (e.g., "forgot password")
- A link to register a new account
- And of course, a button that you can click, to actually login! (Most login forms, but not all, will also submit the login if you press 'Enter'.)
For more "traditional" websites, when you click on "log in", you are in fact making a POST request to the login endpoint. The form data comprising your username and password gets attached to this request. The login endpoint verifies your credentials, and routes you to yet another page depending on whether these credentials checked out. As a user, you might see the page refreshing one or more times during this login process. This is "old school".
Many modern websites operate differently, using a Single-Page Application (SPA) architecture. For such websites, clicking "log in" instantiates an asynchronous request to the login endpoint, which processes the login and returns some response (typically JSON). The application processes this response and decides what to do with it (and with you, the user). The appropriate content is smoothly rendered in the browser.
While a Single-Page Architecture provides a superior user experience, it also (unfortunately) provides a superior experience for attackers!
Walking through a login
Let's examine what actually happens under the hood during a login.
Note that you can follow along the steps below in your own browser, using your browser's Developer Tools. Check out the course notes on Developer Tools.
Clicking "Log in" triggers an HTTP POST request to https://www.southwest.com/api/security/v3/security/authorize. This POST request is decorated with some request headers:
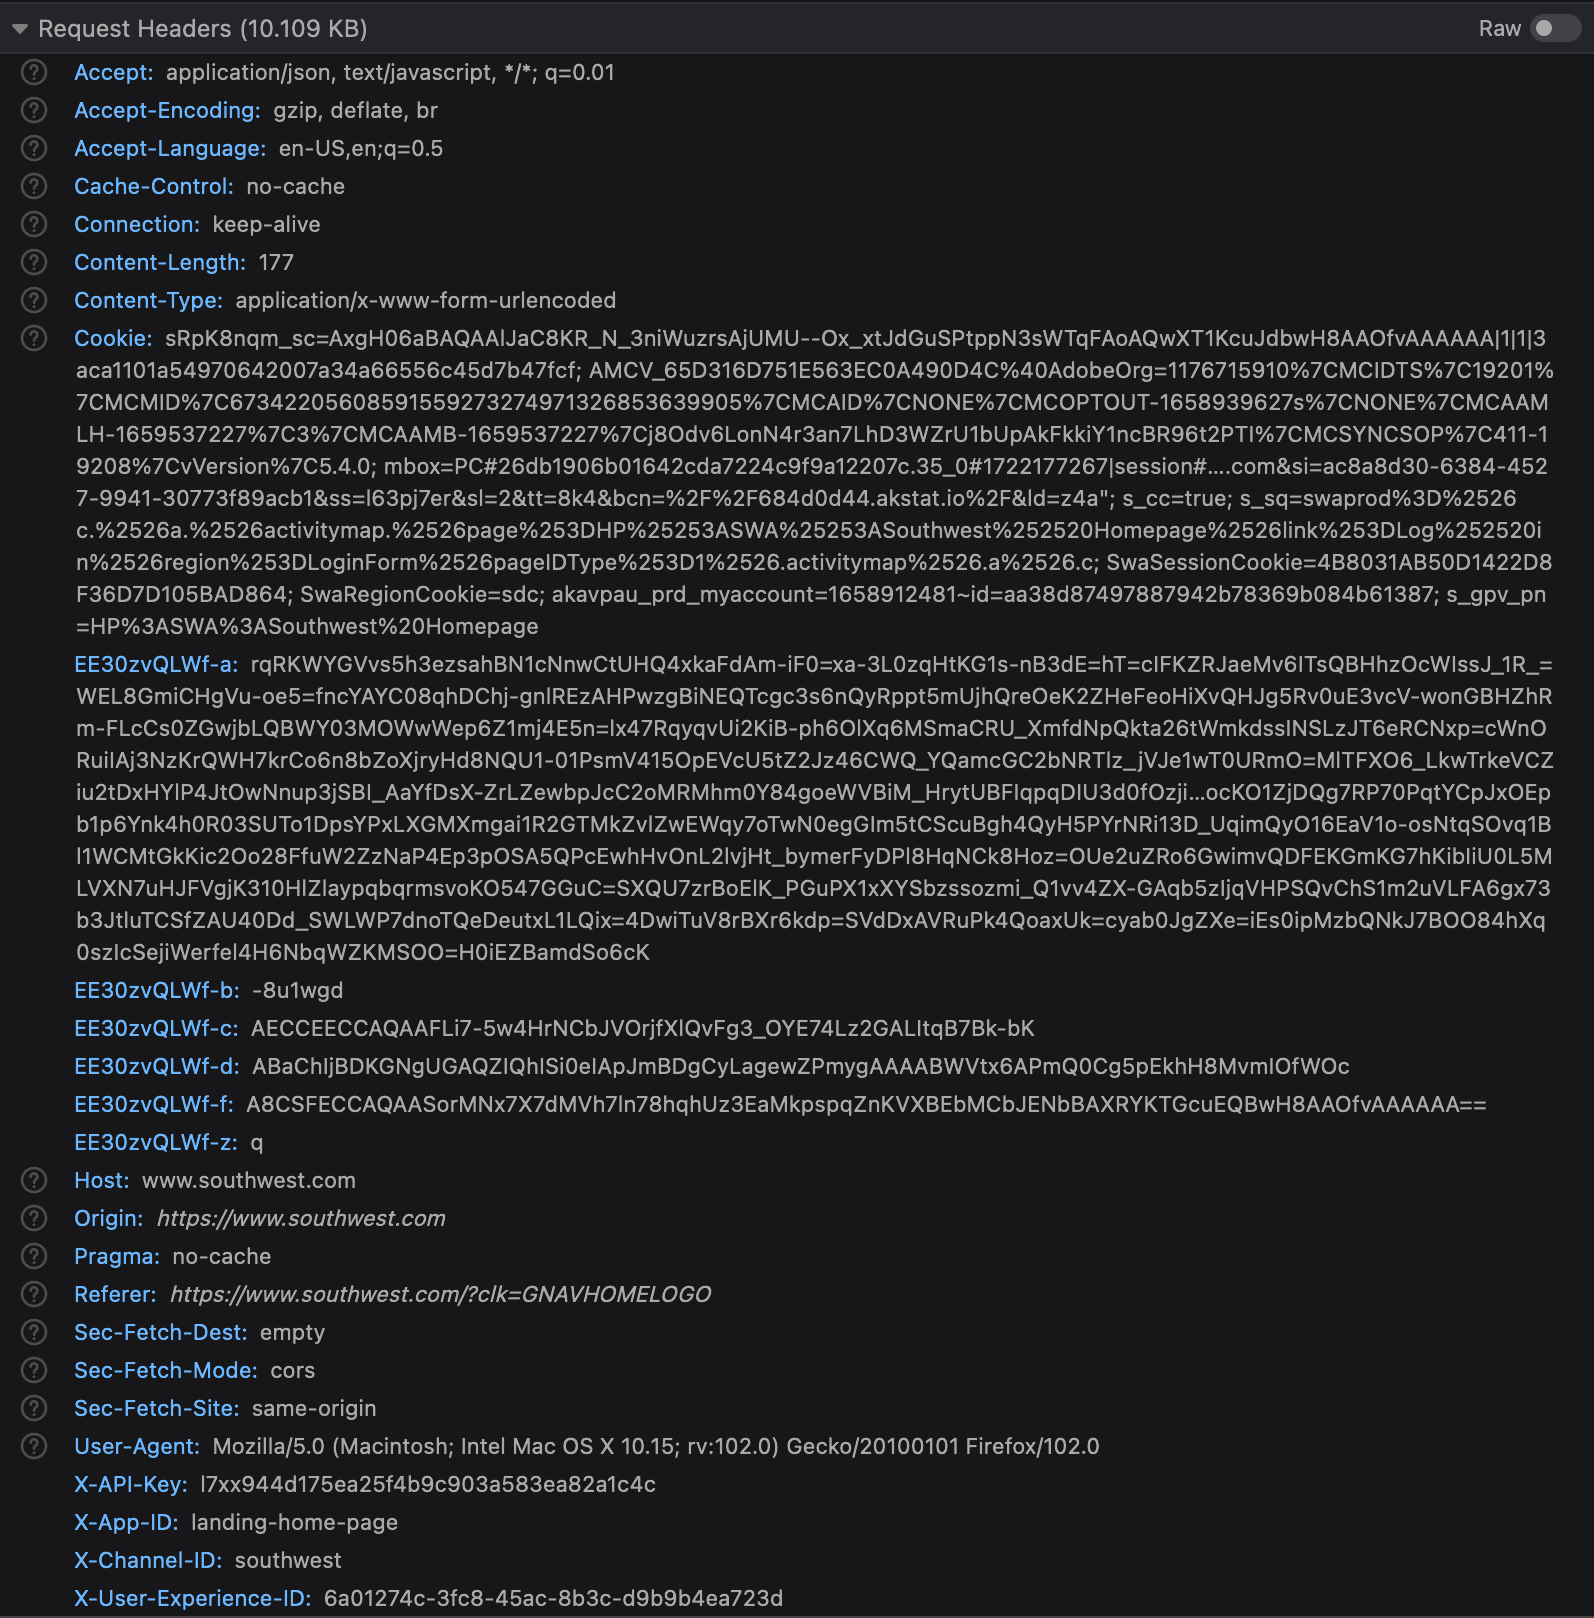
Being a POST request, there is also a payload. In this case, it looks something like:
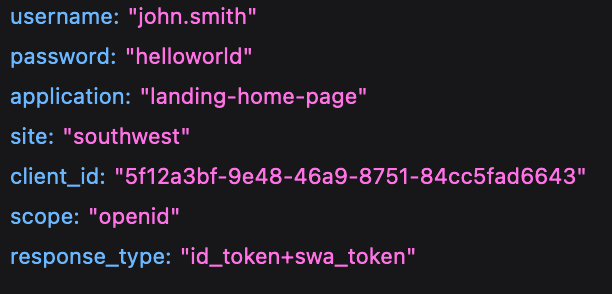
In this example, I had provided invalid credentials. Southwest's authentication server (also known as the origin server) responded with the following JSON:
{
    "code": 400618202,
    "requestId": "6a01274c-3fc8-45ac-8b3c-d9b9b4ea723d:5sSdH8nvRUqK1wbfq-VEZA:southwest",
    "infoList":
    [
        ""
    ],
    "message": "",
    "error": "invalid_grant",
    "httpStatusCode": "BAD_REQUEST"
}
On the other hand, a valid login would yield this:
{
    "access_token": "3b9dbb87-7416-4585-bbe2-19299dffc301",
    "scope": "openid dotcom:web",
    "id_token": "eyJhbGciOiJSUzI1NiJ9....",
    "token_type": "Bearer",
    "expires_in": 2073600
}
I've truncated the id_token, since that is a JSON web token that can be easily decoded (using something like jwt.io) to reveal my personal details! Here is a sample of what the web token reads. (Clearly, I am a very long away from achieving any status on Southwest Airlines!)
{
  "at_hash": "I6rmwp2isrZEuYCWs0QRSw",
  "sub": "20917431441",
  "apiKey": "l7xx944d175ea25f4b9c903a583ea82a1c4c",
  "iss": "https://api-security.southwest.com",
  "nonce": "20917431441:1658943207",
  "version": "api-security/v3",
  "aud": "27f6e3c6-32f0-49ae-b336-311f9a704164",
  "original_auth_time": 1658943207,
  "azp": "27f6e3c6-32f0-49ae-b336-311f9a704164",
  "auth_time": 1658943207,
  "eat": "25270D2DFFC5913BD2DAE1EDD45CF20322014B63ABA92E28427507E74C7494BE15E79F42",
  "apiContext": {
    "customerInformation": {
      "lastName": "Mak",
      "addressLine1Text": "xxx",
      "tierStatusPending": false,
      "redeemablePoints": 0,
      "accountType": "MEMBER",
      "addressCityName": "Mountain View",
      "primaryPhoneNumber": "650xxxxxxx",
      "accountNumber": "2xxx",
      "accountStatus": "ACTIVE",
      "companionPassInfo": {
        "companionQualifyingFlights": 0,
        "companionQualifyingFlightsRemaining": 100,
        "companionQualifyingPoints": 0,
        "companionQualifyingFlightsRequired": 100,
        "companionDeclared": false,
        "companionQualifyingPointsRequired": 125000,
        "companionQualifyingPointsRemaining": 125000,
        "companionPassAchieved": false
      },
      "firstName": "Yiing Chau",
      "addressPostalCode": "94040",
      "memberStartDate": "2019-04-30",
      "chaseVisaRrEnrolled": false,
      "accountCreatedDate": "2019-04-30",
      "credential": "2xxxx",
      "tier": "NON_ELITE",
      "addressLine2Text": "xxx",
      "addressStateCode": "CA",
      "preferredName": "Mak",
      "primaryEmail": "xxx@xxx.com"
    }
  },
  "exp": 1661016807,
  "iat": 1658943207
}
The web token also contains a lot of security-related information, including when the token expires, the token issuer, and so on.
A detour on unix timestamps
If you are not already familiar with Unix timestamps, check out https://www.epochconverter.com/.
In the example above, the exp value is 1661016807. This refers to when the token will expire, and translates to 20 August 2022, which is approximately 24 days after today (at the time of writing).
You can also find the difference between exp and iat to deduce how long the session will last: (1661016807 - 1658943207)/3600/24 = 24 days
Note that whether the server will respect this expiry is a different issue altogether!
Note also that timestamps can come in different resolutions: seconds, milliseconds or even microseconds. For example, if you run the following Python code:
import time
print(time.time())
You will get the current Unix timestamp in microseconds, e.g. 1664220042.855861. 855861 is the number of microseconds that has elapsed for the current second.
After I logged in successfully, the Southwest website makes several other calls to various API endpoints to fetch data necessary for its application logic, such as:
- POST to
/api/landing-page/v1/landing-page/feature/upcoming-trips-secure - POST to
/api/chase/v2/chase/offers - POST to
/api/content-delivery/v1/content-delivery/query/placements
Most websites would store data retrieved from such APIs in the browser, to avoid having to fetch this data repeatedly with every page visited. Some common places to look for such data are cookies, local storage, and session storage.
In this Southwest example, you might notice that there are interesting tidbits of data stored in session storage, with intriguing names such as:
CustomerStore-accessToken-corporateSupportUserInformation-ctmInformation-customerInformation-idToken-lastModified-token-typeToken-userRole-v3GeolocationStore-geolocationData-v1ChasePrequalNoOfferStore-customerToken-highValueIndicator-swaOffersIdentitySource-v1
...and so on.
Tools of the trade: automating web application requests (and responses)
There are many ways to programmatically send web application requests and handle responses.
CURL
One quick and dirty way to send a request is to copy the desired request from the browser's inspector tool as a CURL request. For example, a login to starbucks.com generates a POST request, and you can easily copy it as a CURL request:

This yields something like the following (truncated for brevity):
curl 'https://www.starbucks.com/bff/account/signin' -X POST -H 'User-Agent: Mozilla/5.0 (Macintosh; Intel Mac OS X 10.15; rv:103.0) Gecko/20100101 Firefox/103.0' -H 'Accept: application/json' -H 'Accept-Language: en-GB,en;q=0.5' -H 'Accept-Encoding: gzip, deflate, br' -H 'X-NewRelic-ID: VQUHVlNSARACUFRWDgADVA==' -H 'newrelic: eyJ2IjpbMCwxXSwiZCI6eyJ0eSI6IkJyb3dzZXIiLCJhYyI6IjEzMDc1MTkiLCJhcCI6IjI0NTQ5MzA1IiwiaWQiOiJlZWZkOTg1MjI4NTFiNTA0IiwidHIiOiIwNjM2ODIyMzAzOGNjNGI1M2YwYmY5OTU2MzZkN2UzMSIsInRpIjoxNjYwMzI3ODk0OTQ3LCJ0ayI6IjEzMDYzMTIifX0=' -H 'traceparent: 00-06368223038cc4b53f0bf995636d7e31-eefd98522851b504-01' -H 'tracestate: 1306312@nr=0-1-1307519-24549305-eefd98522851b504----1660327894947' -H 'Content-Type: application/json' -H 'X-DQ7Hy5L1-f: A9zoQJOCAQAAgSP9HrbTA261IYeQ3RR7-5xJkzaGTzAPUwtP7Nda2-YWo-_0AXRYKTGcuC7ywH8AAOfvAAAAAA==' -H 'X-DQ7Hy5L1-b: -uax7rr' -H 'X-DQ7Hy5L1-c: AACFNpOCAQAAVZUUGgwIDn7hR0C2ZNB7IcIWQokGYSAcwQUCtoOmzIUXAfX5' -H 'X-DQ7Hy5L1-d: ABaChIjBDKGNgUGAQZIQhISi0eIApJmBDgCDpsyFFwH1-f____-95wXSAayCkoAAA12fj0vw6CIlnAQ' -H 'X-DQ7Hy5L1-z: q' -H 'X-DQ7Hy5L1-a: ...' -H 'Origin: https://www.starbucks.com' -H 'Connection: keep-alive' -H 'Referer: https://www.starbucks.com/account/signin?ReturnUrl=%2F' -H 'Cookie: AKA_A2=A; _ga=GA1.2.389146271.1660327877; _gid=GA1.2.1781823641.1660327877; _gcl_au=1.1.2057194843.1660327877; _ga_VMTHZW7WSM=GS1.1.1660327877.1.1.1660327894.0; _gat_UA824243791=1; RT="z=1&dm=www.starbucks.com&si=773d916a-792b-4974-b7be-f48ffed70458&ss=l6qscjrl&sl=1&tt=2a3&rl=1&nu=4kwvsnl6&cl=f40"; ux_exp_id=080278c1-e071-4406-a9b9-ee70a6182c3f; tiWQK2tY=A9zoQJOCAQAASosJ0j988itway00_V92M9Xlp8hC0A-6BxrZ6dda2-YWo-_0AXRYKTGcuC7ywH8AAOfvAAAAAA|1|0|f05f0f18d2a7791e0cdbb722a20b06177d3b8e19; notice_behavior=implied,us; notice_gdpr_prefs=0,1,2:; notice_preferences=2:; cmapi_gtm_bl=; cmapi_cookie_privacy=permit 1,2,3; fp_token_7c6a6574-f011-4c9a-abdd-9894a102ccef=PRwUwPocnjruXTNcJOkDohD+xLwTlQs+EJWWRDQsGw4=; _uetsid=2c35c7601a6a11edaf740b31cb7f78cb; _uetvid=2c35db501a6a11ed9a30b76bd85379bb; _gat_mpgaTracker1=1; _gat_UA-82424379-1=1' -H 'Sec-Fetch-Dest: empty' -H 'Sec-Fetch-Mode: cors' -H 'Sec-Fetch-Site: same-origin' -H 'TE: trailers' --data-raw '{"username":"john.smith@gmail.com","password":"hello123","rememberMe":true,"market":"US","transactionSubType":"signin","reputation":{"deviceFingerprint":"..."}}'You can simply paste this into a terminal and run it, and it would be very difficult for the web application to know that you had initiated this request outside a browser.
In many cases, you can also integrate CURL into a shell script. This is helpful if, for example, you want to make the same request many times.
API testing tools
Developers often use tools such as Postman and Hoppscotch to test APIs. Such tools allow you to customize requests and responses in-flight by adding and modifying headers, updating the request body, and so on. If you use VSCode, Thunder is a good extension that provides most of the same functionality.

Note that the web-based tools, such as Hoppscotch, will send requests not from your device but from the cloud. This may cause your request to be flagged by some applications (for good reason!).
Project hint
Postman makes it really easy for you to create and send API requests. You will likely find it incredibly helpful as you work on the Week 1 project.
Here is a good tutorial for Postman: https://learning.postman.com/docs/getting-started/sending-the-first-request/. Try sending your first request!
Once you have done that, take five minutes to go over the 'Building Request' section in Postman's documentation too: https://learning.postman.com/docs/sending-requests/requests/
Python Requests
You can also send requests using the Python requests library. It's really simple to use and great for automating simple commands. See the docs here. This is probably what you'll end up using if you want to programmatically send a different request each time, and then take different actions based on the response.
Project hint
Python requests will be sufficient for the Week 1 project.
Selenium Webdriver
Many websites employ various levels of anti-automation techniques, to prevent scripts from impersonating end-users or from scraping their website. For example, a website may not allow you to make a POST request to login, unless it has detected a click or keystroke on the login form. In such cases, you may need to interact more precisely with the UI to generate automated application requests.
One way that you can do this is to run a 'headless browser', or a 'webdriver'. This is simply a browser instance that you can control programmatically. A popular framework is Selenium on Python.
Note that this will still fail for websites that employ relatively advanced bot defense techniques, but it should get you going for most websites (and for scraping).
Member discussion